Legato Networker备份系统维护(上)
出处:天极网 作者:务实工作室 时间:2004-11-1 10:09:00
随着人类对计算机的依赖性越来越强,计算机中的数据在人类的各种活动中起着越来越重要的作用。甚至可以说,丢失了计算机中的业务数据,一个企业就失去了生存的基础。虽然计算机硬件速度越来越快,质量越来越可靠,但各种人为的、自然的和计算机本身的因素仍时常导致计算机硬盘上数据的丢失,如果不采取一定的保护措施,将导致无法挽回的损失。
目录
备份系统的安装配置
备份系统的基本拓扑结构
服务器软软件系统的安装配置
UNIX 客户端备份软件的安装配置
客户端Oracle备份模块的安装配置
就目前使用数据备份总的来讲可分为两大类:一种是离线(Off-line)备份,即把数据备份到磁带上去,目前的新技术有LAN-free、Server-free等,这种方式恢复时间比较长,但投资较少;另一种是在线(On-line)备份,也称数据复制,即同步数据备份,恢复时间非常短。两种备份方式适用于一般企业的应用,对于一些关键行业,如电信、金融服务等,就需要采用远程备份,把它的数据和应用存到异地,如遇突发事件,就可以依靠异地系统马上恢复数据并启动应用。
目前流行的离线数据备份软件有很多种,如VERITAS NetBackup、Legato NetWorker、CA ARCserve、HP OpenView OmnibackⅡ、IBM ADSM等,都具有自动定时备份管理、备份介质自动管理、数据库在线备份管理等功能。其中,VERITAS、Legato和CA是独立软件开发商,注重于对各种操作系统和数据库平台的支持,而HP和IBM更注重于对本公司软/硬件产品的支持。对于在线数据备份产品,像VERITAS、EMC、HP、HDS这些通用的存储厂商的数据复制都是磁盘卷级的,可以针对任何应用进行复制。还有一种就是面向应用的复制软件,由数据库厂商提供,比如Oracle、Sybase,这些厂商自己都提供一种数据备份,用户把它的数据同步复制到另外一个地方去,每一个厂商的产品各有特色。在这里我们主要是讨论Legato NetWorker数据备份系统。
美国Legato公司专门致力于网络系统数据的保护,其开发的网络系统数据管理软件Networker,提供了客户机/服务器计算环境的数据备份管理模式。基于这种模式实现了网络数据备份的全自动、集中式管理,同时提供了良好的存储介质管理思想。Networker软件支持多种UNIX操作系统、Novell 公司的Netware网络系统、微软公司的Windows NT操作系统和其它PC平台的多种操作系统等。同时Networker还支持目前流行的几乎所有的存储备份设备,如 4mm、8mm、DLT、3480/3490、S-VHS、optical等等。
Networker软件是一个应用级的软件,它工作于操作系统之上,借助网络协议在多台计算机之间传输数据。其工作方法是:在一个具有多种平台的网络计算机环境中,选定一台NT或UNIX的网络服务器作为Networker的备份服务器,其上连接磁带机或磁带库等备份设备且安装Networker软件的服务器端软件,该台服务器叫做Networker的备份服务器。需要备份保护的其它网络服务器或一般计算机,只需安装Networker的客户端软件,就叫做Networker客户机。一台备份服务器可以同时备份多台客户机上的文件,而不管多台客户机是不是一样的操作系统。Networker以它独有的记录方式可以将多种操作系统的文件同时写到一个备份设备(如一盘磁带)上。Networker软件对备份过的内容有详细、全面的管理,它通过两个索引:文件索引和媒体索引来定位文件在磁带上的位置,即要恢复某一个文件 时,Networker软件先通过两个索引找到所需要的磁带和该文件在磁带上的位置,然后就可以很快地恢复回文件,这样既提高了恢复的速度,还避免了找不到所需磁带的场面发生。Networker对日常的备份工作通过日志记录下所有的操作过程,便于管理员监控备份过程,科学合理地调整备份策略,使备份工作做到最有效、最合理,从而为整个计算机系统提供强有力的保障。
作为一个单位的网管员(系统管理员)来说,掌握一门数据备份软件的使用、运行与维护是必须的,也是必要的;即学习和掌握备份软件的服务器、客户端(windows、unix)以及数据库备份模快如Oracle的安装配置,备份策略的制定、备份系统的日常管理、备份系统的运行维护以及当系统发生意外时的灾难恢复等内容;下面以Legato NetWorker备份系统为例分别给予说明。
一、备份系统的安装配置
一)备份系统的基本拓扑结构
备份系统的基本网络拓扑结构为: 在用户现有网络系统中,连入一台Windows NT/2000服务器,作为NetWorker备份服务器,在此服务器上连接一台备份设备:一台STK9730磁带库,其拓扑结构图如图1

图1备份系统拓扑结构图
二) 服务器软软件系统的安装配置
1、备份服务器软件系统的安装(Win NT/2000)
本文仅以备份服务器的操作系统平台是Windows NT为例。备份服务器软件系统的完整安装过程包括:Windows NT 操作系统的安装(包括NT SERVICE PACK 5 补丁软件的安装)、磁带机驱动程序的安装、备份软件Networker的安装、存储设备的配置和软件的注册。
① Windows NT 操作系统的安装
将Windows NT 安装光盘放入光驱引导WINDOWS NT服务器(为了能从光盘引导系统,在BIOS中设好光驱为第一个引导设备后,重启服务器之前将NT 引导光盘插到光驱中),进入Windows NT安装程序。安装时,可以按照安装程序提示的步骤进行。其中应注意的几点为:
1) 整个WINDOWS NT服务器硬盘只分一个区(如原来已经有分区,可将原来的分区全部删除),当安装程序提示选择文件系统类型时,请选择NTFS 文件系统类型;
2)配置网络的时候,只选中TCP/IP协议并按整个网络的规划设置WINDOWS NT服务器的IP地址和网络屏蔽码(如:IP为203.207.65.1,屏蔽码为255.255.255.0);主机名(Host Name)设置为backupsvr;
3)选择NT服务器的角色(ROLE)时,选择独立服务器(STAND ALONE SERVER)即可。
② Windows NT Service Pack 5软件的安装
Windows NT Service Pack 5软件是由微软公司提供的NT操作系统的更新修复软件,它修复了NT操作系统的一些缺陷,在安装Networker备份软件之前,一定要先安装它。在Windows NT系统启动起来以后,将Windows NT Service Pack 5光盘插入光盘驱动器中即可自动启动安装程序,安装界面是"Microsoft Internet Explorer"浏览器窗口,用鼠标左键单击窗口最上角的小方框将窗口放大,再用鼠标左键单击窗口右下角的"向下箭头"移动窗口内容,找到蓝色的"安装Service Pack",然后用鼠标左键单击"安装 Service Pack"进到"Internet Explorer"窗口,用鼠标左键单击"打开(P)"之前的圆框,使黑色的小点位于该圆框中("保存到磁盘(S)"之前的圆框变为空),然后用鼠标左键单击"确定",在屏幕上出现"欢迎使用Service Pack安装程序"窗口时,用鼠标左键单击"下一步(N)",转到"软件许可协议"窗口时,用鼠标左键单击"是(Y)"认可该协议并进到"Service Pack安装程序"窗口,用鼠标左键单击"下一步(N)",屏幕提示是否创建卸载目录,用鼠标左键单击"不,我不想建立卸载目录"之前的小圆框,再用鼠标左键单击该窗口中的"下一步(N)"进入"准备安装Service Pack"提示屏下,直接按回车键或用鼠标左键单击"完成"开始实际的安装过程,在安装过程当中需要注意的两点是:在拷贝文件当中会弹出一个小窗口,提示你需要覆盖网卡和磁带机的驱动程序等,这些情况下,请都选择"NO",不让覆盖。拷贝完文件后需重新启动NT操作系统,至此Windows NT Service Pack 5安装完毕。
③ 备份软件Networker的安装(以Networker5.0为例)
安装Networker之前请确认以下几点:
各种硬件连接、配置、检测、工作均正常,WINDOWS NT的BIOS正确设置;
Windows NT操作系统软件、设备驱动程序、网络配置、Windows NT Service Pack 5已经全部装好。
除上述两点外,还要编辑好HOSTS文件中的内容,HOSTS文件的目录全路径是: c:\winnt\system32\drivers\etc\hosts ,可用EDIT或NOTEPAD编辑工具对其内容进行修改,要增加的内容有两个,一个是备份服务器的名字和IP地址,一个是COMPAQ小型机的名字和IP地址,其格式如下:
将类似以上内容的两行(IP地址、主机名会不一样)加到你的备份服务器硬盘上的HOSTS文件中。
然后在MS-DOS提示符下检测网络运行状况是否正常:
c:\ping backupsvr (检测备份服务器网络是否正常)
c:\ping compaq (检测COMPAQ与备份服务器的网络连接)
如果网络正常,则上述命令的结果类似为"reply from 203.207.65.1 bytes=32 times<10ms TTL=128" ,否则网络可能配置不正确,需重新检测配置。
一旦确认上述配置都正确以后,启动备份服务器并登录到Windows NT管理窗口下,将"NetWorker Clients and Servers"光盘插入光盘驱动器,此时将自动启动Legato Networker的安装窗口如下图2
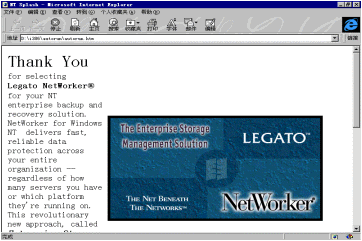
图2
用鼠标左键单击上图右下角的向下箭头,直到出现如下界面如图3
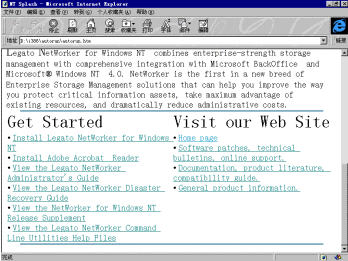
图3
用鼠标左键单击"Install Legato Networker for Windows NT"进到下述界面如图4
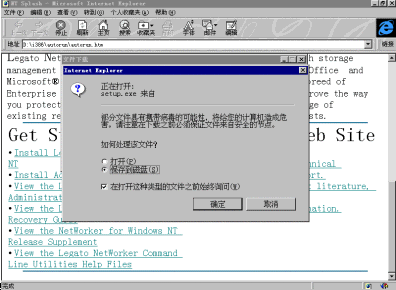
图4
用鼠标左键单击上述灰色窗口的"如何处理该文件"下的"打开(P)"之前的小圆框,使黑色小点落到"打开(P)"之前的小圆框内,然后再用鼠标左键单击"确定",此时,由于是采用浏览器方式安装软件,系统会提示文件可能有病毒,出现如下图5窗口:

图5
用鼠标左键单击"Yes"继续安装的准备过程,如下图6所示:
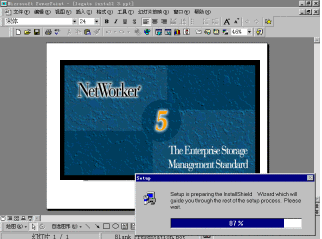
图6
等上述窗口的百分比走到100%后,屏幕上出现以下窗口让你选择你要安装的Networker角色,如下图7所示:

图7
保留"Server and Client"之前的圆框内的小黑点,用鼠标左键单击右下角的"Next>"往下安装进到以下图8窗口:
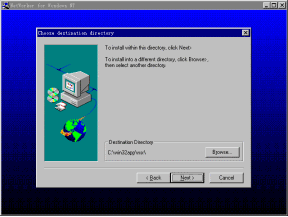
图8
图8窗口用来选择Networker软件所安装的目录,使用缺省值"c:\win32app\nsr\",再用鼠标左键单击上面窗口中的"Next>"进到以下图9窗口:
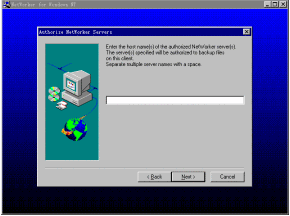
图9
图9窗口是提示让你在该窗口中间的白条框中输入备份服务器的名字,在框中输入backupsvr并用鼠标左键单击"Next>"就可接着往下安装并开始拷贝文件的过程,显示窗口如下图10:
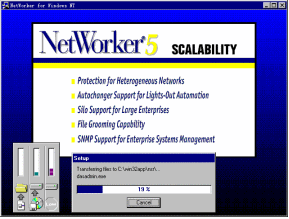
图10
文件拷贝完100%后,即完成了Networker备份系统软件的安装,请最后确认(在提示安装已完成的屏幕上用鼠标左键单击"OK")就可以,并关掉下图11(按窗口右上角的X):

图11
④ 存储设备的配置
安装完Networker软件以后,下面开始的工作就是对备份系统的配置和管理,第一步是配置存储设备:磁带库和光盘库。由于在NT系统中安装Networker时,系统缺省配置的磁带机类型是4mm的,而本系统配的磁带机为DLT7000的,所以必须先将缺省的磁带机设备删除。 进到Networker软件的管理界面如下图12所示:
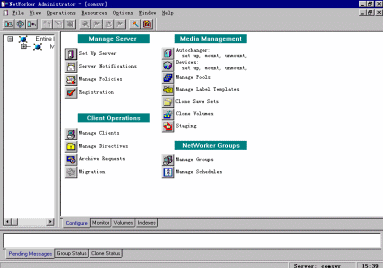
图12
在"Media Management"绿条下方用鼠标左键单击"Devices"旁的图标进到"Devices"窗口下图13:
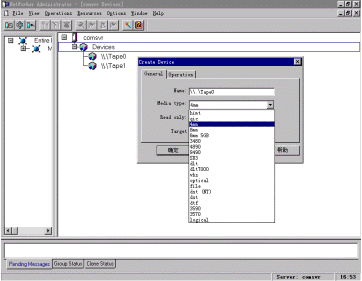
图13
在图13窗口(未有"Create Device"小灰色窗口时)中用鼠标右键单击"\\.\Tape0",再用鼠标左键单击弹出小窗口中的"Delete",将Networker系统自动安装的磁带机设备名删除,然后先退出Networker管理程序,做磁带库设备和光盘库设备的配置。
按前面所说的方法进到MS-DOS提示符C:>下,然后用DOS命令"CD C:\WIN32APP\NSR\BIN"转到Networker程序目录下,如下图14所示:
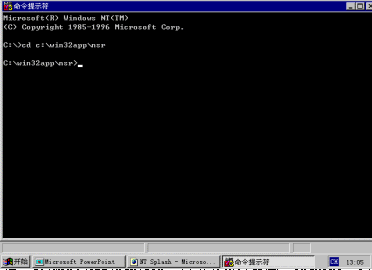
图14
在"c:\win32app\nsr\bin"目录下执行命令"inquire"检测存储设备的连接状况和驱动情况:
类似上述输出表示设备连接正常,在备份服务器上,由于连接了磁带库,请注意它们在上述命令的输出中的设备名,磁带库的设备名为:
\\.Tape0,且磁带库的Autochanger型号为STK 9730,
可接着用命令"jbconfig"作磁带库的配置过程,以下为一个配置磁带库的例子:
(注意:在此处方括号中的设备名是系统自动给出的,直接回车就可以,然后会提示你选择设备的类型,磁带库为DLT7000)
注意,上述输出中只有那些带下划线的为需要你输入或回车确认(方括号中的一般回车确认即可)。其余为系统的提示。按上述过程将光盘库与磁带库都配置好以后,即可以用命令"EXIT"退出MS-DOS提示符状态,回到NT的Windows界面。从而将存储设备配置完毕。
⑤ 备份软件的注册
Legato Networker备份软件是通过授权码限制软件的盗版使用,其授权码分为两种:一种是Enable Code;一种是Auth Code。在购买软件时只有Enable Code,Auth Code要根据具体的Enable Code和备份服务器的主机号Host id来生成并最终由美国Legato公司授予。Legato Networker备份软件的授权规则是:第一次安装好Networker软件后可以使用30天,此30天称为试用期,在试用期内能试用Networker软件的所有功能,但30天内如没有输入Enable Code,则授权终止,备份软件不能继续使用;在安装好Networker软件后的30天内,如果输入了一定的Enable Code,则开始Enable Code使能期,使能期为45天,从此以后,只能使用由Enable Code所激活的那部分功能并必须在此45天内,向美国Legato公司提供Enable Code和备份服务器的主机号Host id以及你公司的信息,申请Auth Code;最后在45天的使能期内将Auth Code输入,完成软件的注册过程。由于授权码与主机名和IP地址有关,在完成软件的注册后,不要轻易修改主机名和IP地址。以下为注册过程:
进到Networker软件的管理界面,在"Manage Server"绿条下方用鼠标左键单击"Registration"旁的图标进到"Registration"窗口,如下图15所示:
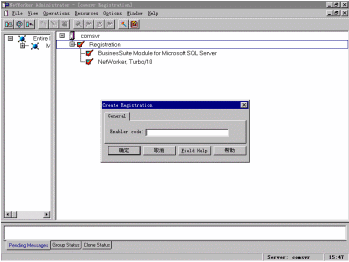
图15
用鼠标右键点击Registration然后用鼠标左键选弹出小菜单条中的Create进入上述灰色的Create Registration窗口,在Enable code框中一次输入一个Enable code,然后重复此过程将所有的Enable code码都输入。
当Auth code到来后,按上述方法进到以上窗口,用鼠标右键点击Registration下面的某一行如Networker Turbo/10,然后用鼠标左键选弹出小菜单条中的Edit进入Edit Registration窗口,在Auth code框中输入该Enable code的Auth code(Auth code与Enable code是一一对应的,不要弄乱),如此重复将所有的Auth code码都输入。这样就完成了软件的注册,可以永久使用了。
三)UNIX 客户端备份软件的安装配置
备份客户机的安装指在Unix小型机上安装Legato Networker的客户端软件,分为三个部分:确认网络连接正常、展开Networker光盘上的压缩文件到硬盘、安装客户端软件。
确认网络连接正常:在小型机上以UNIX用户root登录,并用vi编辑器编辑/etc目录下的文件hosts,将在备份服务器的"c:\winnt\system32\drivers\etc\hosts"文件中的相同内容加到该文件中。然后用下述命令检测网络是否正常:
注:在UNIX下用ping命令时,需用"Ctrl+C"按键中断ping命令的执行,否则它将无休止地运行下去。
安装NetWorker Client软件(以下为在Digital UNIX上安装实例):
将"NetWorker Clients and Servers"光盘插入小型机光盘驱动器,过程如下:
做完上述过程即完成了客户端软件的安装,在备份服务器端以小型机的主机名为名字创建client后即可对它进行备份。
四)客户端Oracle备份模块的安装配置(以在Alpha 机器上为例)
由于数据库上的数据不全是操作系统文件,所以对它们的备份就不同于操作系统文件,必须采取专门的备份方法。NetWorker软件就是采取专门的模块对Oracle 数据库进行备份,它也是安装在COMPAQ小型机上。它的安装过程分为以下几步:
从光盘上解开压缩的文件;
执行安装过程;
安装后的配置;
步骤如下:
当你完成了上述步骤,Oracle备份模块安装配置完毕。至此也就完成NetWorker备份系统的安装配置。【未完待续】 ,
目录
备份系统的安装配置
备份系统的基本拓扑结构
服务器软软件系统的安装配置
UNIX 客户端备份软件的安装配置
客户端Oracle备份模块的安装配置
就目前使用数据备份总的来讲可分为两大类:一种是离线(Off-line)备份,即把数据备份到磁带上去,目前的新技术有LAN-free、Server-free等,这种方式恢复时间比较长,但投资较少;另一种是在线(On-line)备份,也称数据复制,即同步数据备份,恢复时间非常短。两种备份方式适用于一般企业的应用,对于一些关键行业,如电信、金融服务等,就需要采用远程备份,把它的数据和应用存到异地,如遇突发事件,就可以依靠异地系统马上恢复数据并启动应用。
目前流行的离线数据备份软件有很多种,如VERITAS NetBackup、Legato NetWorker、CA ARCserve、HP OpenView OmnibackⅡ、IBM ADSM等,都具有自动定时备份管理、备份介质自动管理、数据库在线备份管理等功能。其中,VERITAS、Legato和CA是独立软件开发商,注重于对各种操作系统和数据库平台的支持,而HP和IBM更注重于对本公司软/硬件产品的支持。对于在线数据备份产品,像VERITAS、EMC、HP、HDS这些通用的存储厂商的数据复制都是磁盘卷级的,可以针对任何应用进行复制。还有一种就是面向应用的复制软件,由数据库厂商提供,比如Oracle、Sybase,这些厂商自己都提供一种数据备份,用户把它的数据同步复制到另外一个地方去,每一个厂商的产品各有特色。在这里我们主要是讨论Legato NetWorker数据备份系统。
美国Legato公司专门致力于网络系统数据的保护,其开发的网络系统数据管理软件Networker,提供了客户机/服务器计算环境的数据备份管理模式。基于这种模式实现了网络数据备份的全自动、集中式管理,同时提供了良好的存储介质管理思想。Networker软件支持多种UNIX操作系统、Novell 公司的Netware网络系统、微软公司的Windows NT操作系统和其它PC平台的多种操作系统等。同时Networker还支持目前流行的几乎所有的存储备份设备,如 4mm、8mm、DLT、3480/3490、S-VHS、optical等等。
Networker软件是一个应用级的软件,它工作于操作系统之上,借助网络协议在多台计算机之间传输数据。其工作方法是:在一个具有多种平台的网络计算机环境中,选定一台NT或UNIX的网络服务器作为Networker的备份服务器,其上连接磁带机或磁带库等备份设备且安装Networker软件的服务器端软件,该台服务器叫做Networker的备份服务器。需要备份保护的其它网络服务器或一般计算机,只需安装Networker的客户端软件,就叫做Networker客户机。一台备份服务器可以同时备份多台客户机上的文件,而不管多台客户机是不是一样的操作系统。Networker以它独有的记录方式可以将多种操作系统的文件同时写到一个备份设备(如一盘磁带)上。Networker软件对备份过的内容有详细、全面的管理,它通过两个索引:文件索引和媒体索引来定位文件在磁带上的位置,即要恢复某一个文件 时,Networker软件先通过两个索引找到所需要的磁带和该文件在磁带上的位置,然后就可以很快地恢复回文件,这样既提高了恢复的速度,还避免了找不到所需磁带的场面发生。Networker对日常的备份工作通过日志记录下所有的操作过程,便于管理员监控备份过程,科学合理地调整备份策略,使备份工作做到最有效、最合理,从而为整个计算机系统提供强有力的保障。
作为一个单位的网管员(系统管理员)来说,掌握一门数据备份软件的使用、运行与维护是必须的,也是必要的;即学习和掌握备份软件的服务器、客户端(windows、unix)以及数据库备份模快如Oracle的安装配置,备份策略的制定、备份系统的日常管理、备份系统的运行维护以及当系统发生意外时的灾难恢复等内容;下面以Legato NetWorker备份系统为例分别给予说明。
一、备份系统的安装配置
一)备份系统的基本拓扑结构
备份系统的基本网络拓扑结构为: 在用户现有网络系统中,连入一台Windows NT/2000服务器,作为NetWorker备份服务器,在此服务器上连接一台备份设备:一台STK9730磁带库,其拓扑结构图如图1

图1备份系统拓扑结构图
二) 服务器软软件系统的安装配置
1、备份服务器软件系统的安装(Win NT/2000)
本文仅以备份服务器的操作系统平台是Windows NT为例。备份服务器软件系统的完整安装过程包括:Windows NT 操作系统的安装(包括NT SERVICE PACK 5 补丁软件的安装)、磁带机驱动程序的安装、备份软件Networker的安装、存储设备的配置和软件的注册。
① Windows NT 操作系统的安装
将Windows NT 安装光盘放入光驱引导WINDOWS NT服务器(为了能从光盘引导系统,在BIOS中设好光驱为第一个引导设备后,重启服务器之前将NT 引导光盘插到光驱中),进入Windows NT安装程序。安装时,可以按照安装程序提示的步骤进行。其中应注意的几点为:
1) 整个WINDOWS NT服务器硬盘只分一个区(如原来已经有分区,可将原来的分区全部删除),当安装程序提示选择文件系统类型时,请选择NTFS 文件系统类型;
2)配置网络的时候,只选中TCP/IP协议并按整个网络的规划设置WINDOWS NT服务器的IP地址和网络屏蔽码(如:IP为203.207.65.1,屏蔽码为255.255.255.0);主机名(Host Name)设置为backupsvr;
3)选择NT服务器的角色(ROLE)时,选择独立服务器(STAND ALONE SERVER)即可。
② Windows NT Service Pack 5软件的安装
Windows NT Service Pack 5软件是由微软公司提供的NT操作系统的更新修复软件,它修复了NT操作系统的一些缺陷,在安装Networker备份软件之前,一定要先安装它。在Windows NT系统启动起来以后,将Windows NT Service Pack 5光盘插入光盘驱动器中即可自动启动安装程序,安装界面是"Microsoft Internet Explorer"浏览器窗口,用鼠标左键单击窗口最上角的小方框将窗口放大,再用鼠标左键单击窗口右下角的"向下箭头"移动窗口内容,找到蓝色的"安装Service Pack",然后用鼠标左键单击"安装 Service Pack"进到"Internet Explorer"窗口,用鼠标左键单击"打开(P)"之前的圆框,使黑色的小点位于该圆框中("保存到磁盘(S)"之前的圆框变为空),然后用鼠标左键单击"确定",在屏幕上出现"欢迎使用Service Pack安装程序"窗口时,用鼠标左键单击"下一步(N)",转到"软件许可协议"窗口时,用鼠标左键单击"是(Y)"认可该协议并进到"Service Pack安装程序"窗口,用鼠标左键单击"下一步(N)",屏幕提示是否创建卸载目录,用鼠标左键单击"不,我不想建立卸载目录"之前的小圆框,再用鼠标左键单击该窗口中的"下一步(N)"进入"准备安装Service Pack"提示屏下,直接按回车键或用鼠标左键单击"完成"开始实际的安装过程,在安装过程当中需要注意的两点是:在拷贝文件当中会弹出一个小窗口,提示你需要覆盖网卡和磁带机的驱动程序等,这些情况下,请都选择"NO",不让覆盖。拷贝完文件后需重新启动NT操作系统,至此Windows NT Service Pack 5安装完毕。
③ 备份软件Networker的安装(以Networker5.0为例)
安装Networker之前请确认以下几点:
除上述两点外,还要编辑好HOSTS文件中的内容,HOSTS文件的目录全路径是: c:\winnt\system32\drivers\etc\hosts ,可用EDIT或NOTEPAD编辑工具对其内容进行修改,要增加的内容有两个,一个是备份服务器的名字和IP地址,一个是COMPAQ小型机的名字和IP地址,其格式如下:
|
将类似以上内容的两行(IP地址、主机名会不一样)加到你的备份服务器硬盘上的HOSTS文件中。
然后在MS-DOS提示符下检测网络运行状况是否正常:
c:\ping backupsvr (检测备份服务器网络是否正常)
c:\ping compaq (检测COMPAQ与备份服务器的网络连接)
如果网络正常,则上述命令的结果类似为
一旦确认上述配置都正确以后,启动备份服务器并登录到Windows NT管理窗口下,将"NetWorker Clients and Servers"光盘插入光盘驱动器,此时将自动启动Legato Networker的安装窗口如下图2

图2
用鼠标左键单击上图右下角的向下箭头,直到出现如下界面如图3

图3
用鼠标左键单击"Install Legato Networker for Windows NT"进到下述界面如图4

图4
用鼠标左键单击上述灰色窗口的"如何处理该文件"下的"打开(P)"之前的小圆框,使黑色小点落到"打开(P)"之前的小圆框内,然后再用鼠标左键单击"确定",此时,由于是采用浏览器方式安装软件,系统会提示文件可能有病毒,出现如下图5窗口:

图5
用鼠标左键单击"Yes"继续安装的准备过程,如下图6所示:

图6
等上述窗口的百分比走到100%后,屏幕上出现以下窗口让你选择你要安装的Networker角色,如下图7所示:

图7
保留"Server and Client"之前的圆框内的小黑点,用鼠标左键单击右下角的"Next>"往下安装进到以下图8窗口:

图8
图8窗口用来选择Networker软件所安装的目录,使用缺省值"c:\win32app\nsr\",再用鼠标左键单击上面窗口中的"Next>"进到以下图9窗口:

图9
图9窗口是提示让你在该窗口中间的白条框中输入备份服务器的名字,在框中输入backupsvr并用鼠标左键单击"Next>"就可接着往下安装并开始拷贝文件的过程,显示窗口如下图10:

图10
文件拷贝完100%后,即完成了Networker备份系统软件的安装,请最后确认(在提示安装已完成的屏幕上用鼠标左键单击"OK")就可以,并关掉下图11(按窗口右上角的X):

图11
④ 存储设备的配置
安装完Networker软件以后,下面开始的工作就是对备份系统的配置和管理,第一步是配置存储设备:磁带库和光盘库。由于在NT系统中安装Networker时,系统缺省配置的磁带机类型是4mm的,而本系统配的磁带机为DLT7000的,所以必须先将缺省的磁带机设备删除。 进到Networker软件的管理界面如下图12所示:

图12
在"Media Management"绿条下方用鼠标左键单击"Devices"旁的图标进到"Devices"窗口下图13:

图13
在图13窗口(未有"Create Device"小灰色窗口时)中用鼠标右键单击"\\.\Tape0",再用鼠标左键单击弹出小窗口中的"Delete",将Networker系统自动安装的磁带机设备名删除,然后先退出Networker管理程序,做磁带库设备和光盘库设备的配置。
按前面所说的方法进到MS-DOS提示符C:>下,然后用DOS命令"CD C:\WIN32APP\NSR\BIN"转到Networker程序目录下,如下图14所示:

图14
在"c:\win32app\nsr\bin"目录下执行命令"inquire"检测存储设备的连接状况和驱动情况:
|
类似上述输出表示设备连接正常,在备份服务器上,由于连接了磁带库,请注意它们在上述命令的输出中的设备名,磁带库的设备名为:
\\.Tape0,且磁带库的Autochanger型号为STK 9730,
可接着用命令"jbconfig"作磁带库的配置过程,以下为一个配置磁带库的例子:
|
(注意:在此处方括号中的设备名是系统自动给出的,直接回车就可以,然后会提示你选择设备的类型,磁带库为DLT7000)
|
注意,上述输出中只有那些带下划线的为需要你输入或回车确认(方括号中的一般回车确认即可)。其余为系统的提示。按上述过程将光盘库与磁带库都配置好以后,即可以用命令"EXIT"退出MS-DOS提示符状态,回到NT的Windows界面。从而将存储设备配置完毕。
⑤ 备份软件的注册
Legato Networker备份软件是通过授权码限制软件的盗版使用,其授权码分为两种:一种是Enable Code;一种是Auth Code。在购买软件时只有Enable Code,Auth Code要根据具体的Enable Code和备份服务器的主机号Host id来生成并最终由美国Legato公司授予。Legato Networker备份软件的授权规则是:第一次安装好Networker软件后可以使用30天,此30天称为试用期,在试用期内能试用Networker软件的所有功能,但30天内如没有输入Enable Code,则授权终止,备份软件不能继续使用;在安装好Networker软件后的30天内,如果输入了一定的Enable Code,则开始Enable Code使能期,使能期为45天,从此以后,只能使用由Enable Code所激活的那部分功能并必须在此45天内,向美国Legato公司提供Enable Code和备份服务器的主机号Host id以及你公司的信息,申请Auth Code;最后在45天的使能期内将Auth Code输入,完成软件的注册过程。由于授权码与主机名和IP地址有关,在完成软件的注册后,不要轻易修改主机名和IP地址。以下为注册过程:
进到Networker软件的管理界面,在"Manage Server"绿条下方用鼠标左键单击"Registration"旁的图标进到"Registration"窗口,如下图15所示:

图15
用鼠标右键点击Registration然后用鼠标左键选弹出小菜单条中的Create进入上述灰色的Create Registration窗口,在Enable code框中一次输入一个Enable code,然后重复此过程将所有的Enable code码都输入。
当Auth code到来后,按上述方法进到以上窗口,用鼠标右键点击Registration下面的某一行如Networker Turbo/10,然后用鼠标左键选弹出小菜单条中的Edit进入Edit Registration窗口,在Auth code框中输入该Enable code的Auth code(Auth code与Enable code是一一对应的,不要弄乱),如此重复将所有的Auth code码都输入。这样就完成了软件的注册,可以永久使用了。
三)UNIX 客户端备份软件的安装配置
备份客户机的安装指在Unix小型机上安装Legato Networker的客户端软件,分为三个部分:确认网络连接正常、展开Networker光盘上的压缩文件到硬盘、安装客户端软件。
确认网络连接正常:在小型机上以UNIX用户root登录,并用vi编辑器编辑/etc目录下的文件hosts,将在备份服务器的"c:\winnt\system32\drivers\etc\hosts"文件中的相同内容加到该文件中。然后用下述命令检测网络是否正常:
|
注:在UNIX下用ping命令时,需用"Ctrl+C"按键中断ping命令的执行,否则它将无休止地运行下去。
安装NetWorker Client软件(以下为在Digital UNIX上安装实例):
将"NetWorker Clients and Servers"光盘插入小型机光盘驱动器,过程如下:
|
做完上述过程即完成了客户端软件的安装,在备份服务器端以小型机的主机名为名字创建client后即可对它进行备份。
四)客户端Oracle备份模块的安装配置(以在Alpha 机器上为例)
由于数据库上的数据不全是操作系统文件,所以对它们的备份就不同于操作系统文件,必须采取专门的备份方法。NetWorker软件就是采取专门的模块对Oracle 数据库进行备份,它也是安装在COMPAQ小型机上。它的安装过程分为以下几步:
步骤如下:
|
当你完成了上述步骤,Oracle备份模块安装配置完毕。至此也就完成NetWorker备份系统的安装配置。【未完待续】
| 自由广告区 |
| 分类导航 |
| 邮件新闻资讯: IT业界 | 邮件服务器 | 邮件趣闻 | 移动电邮 电子邮箱 | 反垃圾邮件|邮件客户端|网络安全 行业数据 | 邮件人物 | 网站公告 | 行业法规 网络技术: 邮件原理 | 网络协议 | 网络管理 | 传输介质 线路接入 | 路由接口 | 邮件存储 | 华为3Com CISCO技术 | 网络与服务器硬件 操作系统: Windows 9X | Linux&Uinx | Windows NT Windows Vista | FreeBSD | 其它操作系统 邮件服务器: 程序与开发 | Exchange | Qmail | Postfix Sendmail | MDaemon | Domino | Foxmail KerioMail | JavaMail | Winwebmail |James Merak&VisNetic | CMailServer | WinMail 金笛邮件系统 | 其它 | 反垃圾邮件: 综述| 客户端反垃圾邮件|服务器端反垃圾邮件 邮件客户端软件: Outlook | Foxmail | DreamMail| KooMail The bat | 雷鸟 | Eudora |Becky! |Pegasus IncrediMail |其它 电子邮箱: 个人邮箱 | 企业邮箱 |Gmail 移动电子邮件:服务器 | 客户端 | 技术前沿 邮件网络安全: 软件漏洞 | 安全知识 | 病毒公告 |防火墙 攻防技术 | 病毒查杀| ISA | 数字签名 邮件营销: Email营销 | 网络营销 | 营销技巧 |营销案例 邮件人才:招聘 | 职场 | 培训 | 指南 | 职场 解决方案: 邮件系统|反垃圾邮件 |安全 |移动电邮 |招标 产品评测: 邮件系统 |反垃圾邮件 |邮箱 |安全 |客户端 |